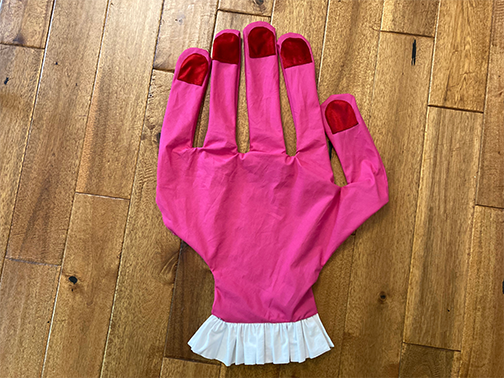
Hey there crafters and creative souls! Are you ready to dive into a whimsical sewing project that’s as fun to make as it is to cuddle with? If you’re seeking a hands-on (pun intended) creative outlet, you’re in the right place. In this step-by-step guide, I’ll walk through how to sew your very own hand pillow using a unique sewing pattern that’s perfect for beginners. Whether you’re aiming to add a quirky touch to your living space or searching for a delightful DIY gift idea, this project is sure to spark your creativity and bring a smile to your face.
Sewing is an old love of mine, even though you may know me as a risograph print artist. I was inspired to create this hand pillow by Gabby La La, my friend and collaborator, who made a hand pillow for her son. I loved it so much that I wanted to make one for my son, but couldn’t find a hand pillow sewing online. Thus the hand pillow PDF sewing pattern was born!
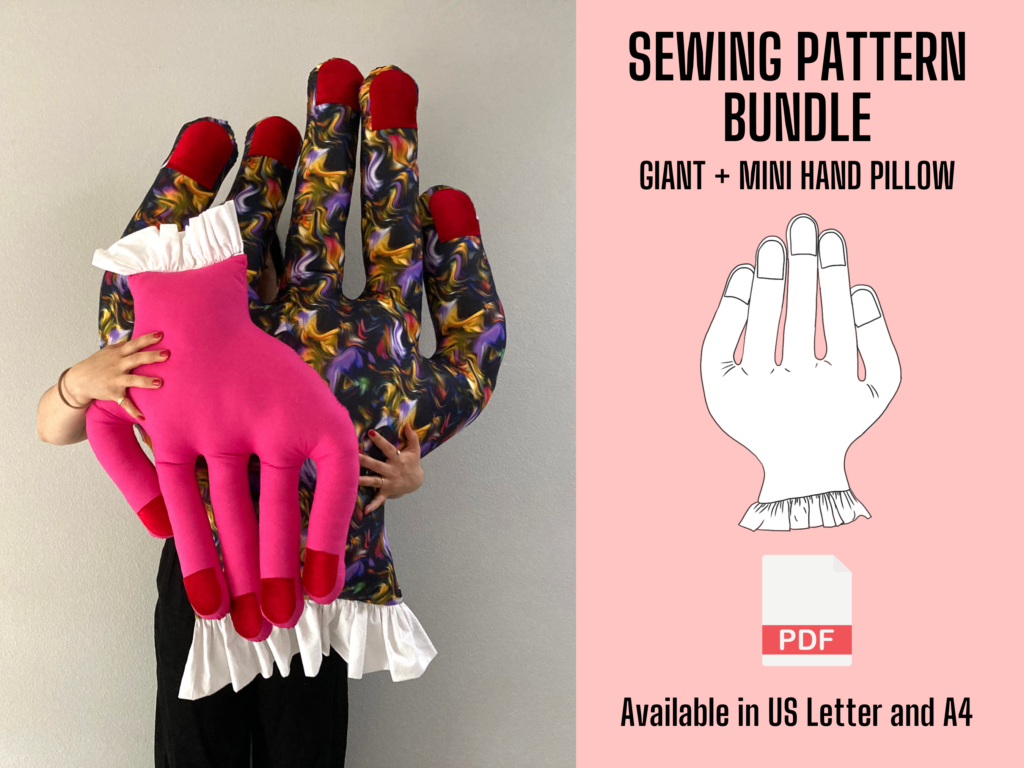
Just a quick note on this Hand Pillow Sewing Pattern PDF: this printable pattern is available in both A4 and US Letter paper sizes so you can print wherever in the world!
Hand Pillow Sewing Instructions
I break down how to make this hand pillow into the following steps:
- Print and Assemble the Pattern
- Cut out the Hand
- Create Nails
- Create Ruffle
- Sew Nails onto Hand
- Sew Ruffle onto Hand
- Sew the Hand
- Stuff your Pillow
- Close the Opening
Here are some handy tips for success because crafting should be a joyous journey, not a stressful race to the finish line.
Hand Pillow Sewing Tips
Tips for Success:
- Every fabric behaves differently, so treat your first pillow as a prototype to learn about your chosen fabrics. Don’t hesitate to experiment and refine your technique for subsequent pillows.
- Before starting your hand pillow, skim through the instructions so that you can anticipate the next step.
- Backstitch! At the beginning and end of every seam, make sure to backstitch. This means forward stitching and reversing your stitch a few times before beginning your seam. This will prevent your starting and end seam from coming undone and will ensure a stronger seam. Watch this helpful video to learn how to backstitch.
- Clip excess thread as you go.This will ensure a neat finished hand and less tangled threads.
- Don’t rush the sewing process. Take your time to ensure accuracy and neatness.
- And finally, enjoy the process as you are making this wacky pillow!! Each of us has a divine spark of creativity to make the world uniquely ours. I can’t wait to see what you make! Please share your pillow with me on Instagram or TikTok: @spooky_slime_smile
If you prefer an Instructable to create this hand pillow, please follow along with my Hand Pillow Instructable.
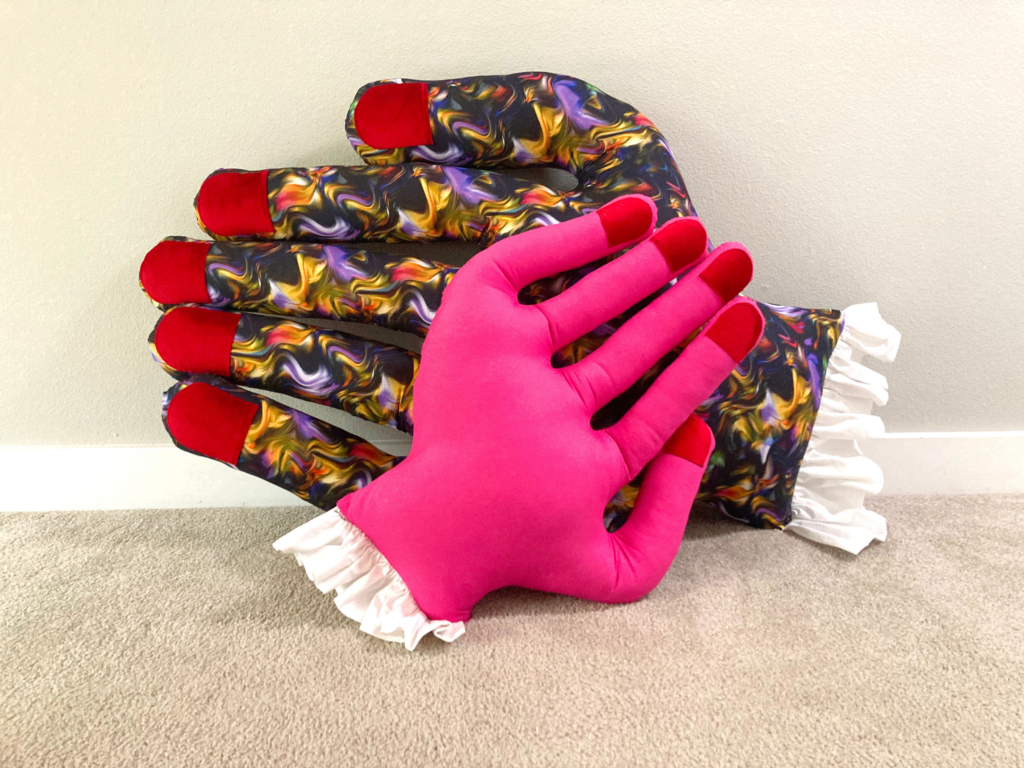
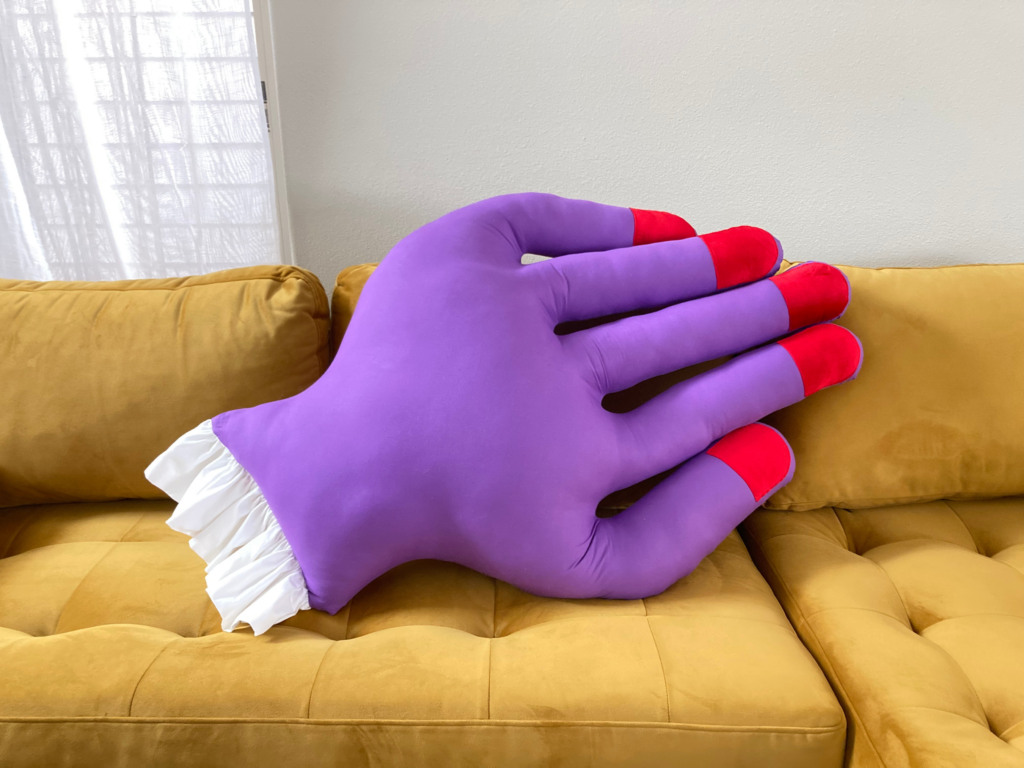
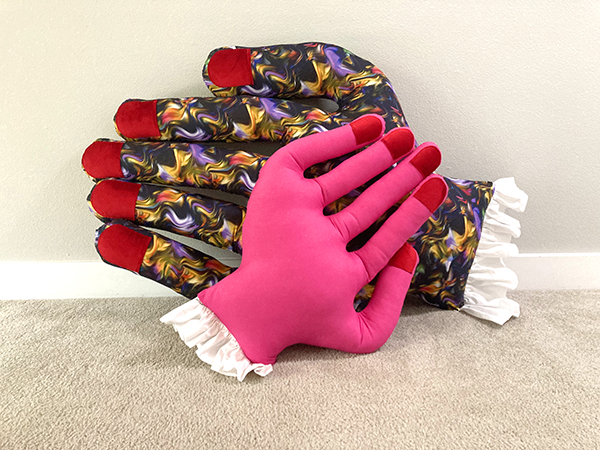
I created two sizes for my hand pillow: the GIANT hand pillow and the MINI hand pillow. In these instructions, I will be created a giant hand pillow, but the sewing instructions are nearly identical. I will mark with a ** when the instructions change for the mini version.
Hand Pillow Measurements
| Giant Hand Pillow | 48” (122 cm) long and 32”(81 cm) wide |
| Mini Hand Pillow | 27” (68.5 cm) long x 18”(46 cm) wide |
In addition to a home printer, US Letter Size or A4 paper and tape to make the paper pattern, you will need the following to get started on this unique pillow:
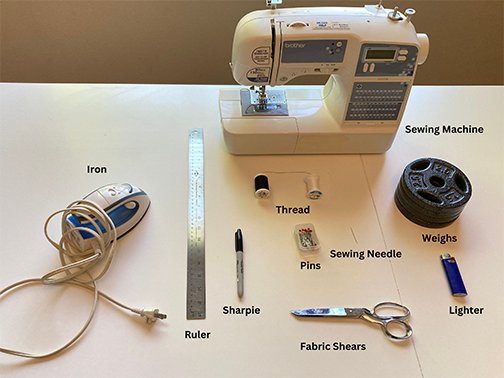
Sewing Tools to Make Hand Pillow
- Ruler
- Sewing Machine
- Iron
- Lighter
- Sharpie or fabric pen
- Pins
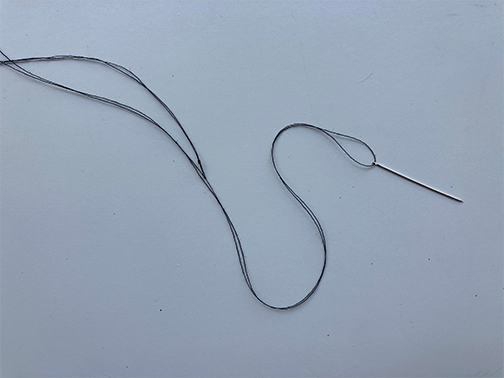
- Sewing Needle
- Seam ripper
- Sharp Fabric Shears
- Washer or Weights (optional)
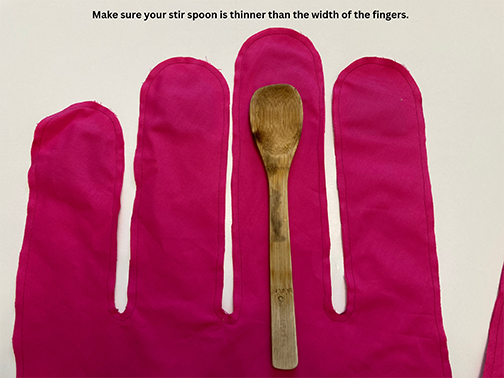
- •• Large wooden stir spoon or spatula (to insert stuffing into the fingers of the mini hand)
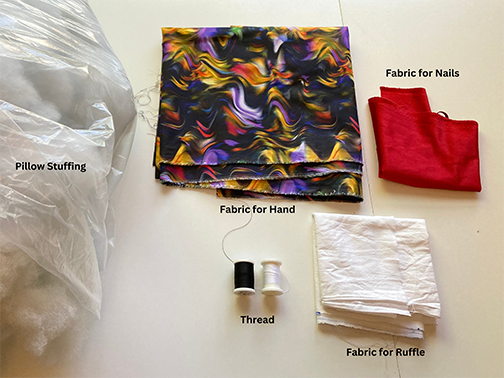
Materials to Make Hand Pillow
Important Note: Make sure to only use non-stretch fabric for this project.
| GIANT HAND PILLOW | MINI HAND PILLOW |
| – 2.75 yards (2.5 meters) fabric for the hand – 24” x 5” (61cm x 13cm) piece non-stretch velvet for nails – 12” x 42” (30.5cm x 107cm) fabric for the ruffle -Matching thread -12lb (5kg) pillow stuffing | – 1.5 yard (1.5 meters) fabric for the hand – 12” x 4” (30cm x 10cm) piece non-stretch velvet for nails – 8”x 24” (20.5cm x 61cm) fabric for ruffle – Matching thread – 5lb (5kg) pillow stuffing |
Hand Pillow Sewing Instructions
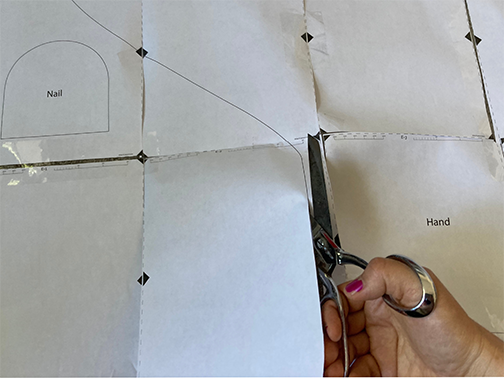
1. Print and Assemble the Pillow Sewing Pattern
First, download the hand pillow sewing pattern PDF on Etsy. This pattern includes both the Giant and Mini hand pillow patterns.
First time using a digital sewing pattern?
Open the PDF using a free Adobe Reader program. If you do not have this program already on your computer, please download it here
Print out the first page and make sure that Scale (not Scale to Fit) is selected at 100%
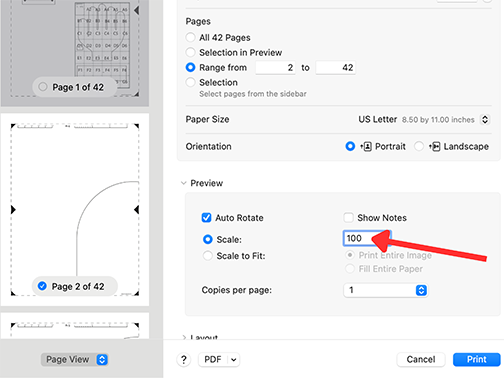
Print out the first page of the pattern and verify sizing with a ruler.
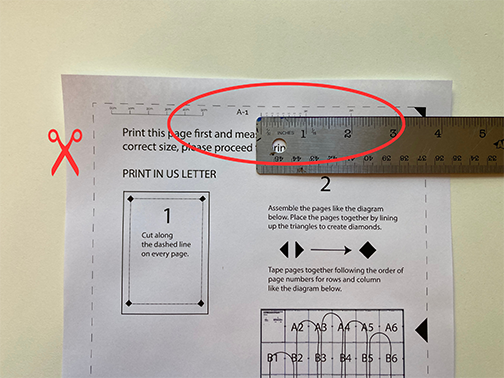
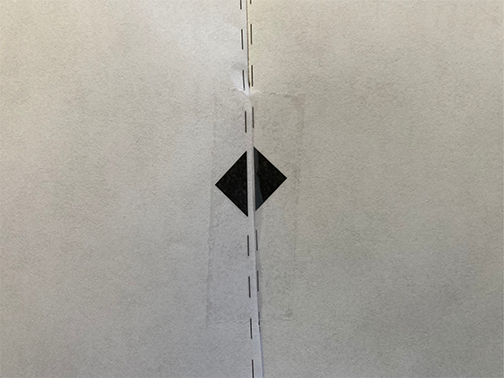
Cut along the dashed line of each page.
Line up the black triangles on each page to create a diamond and tape pages together.
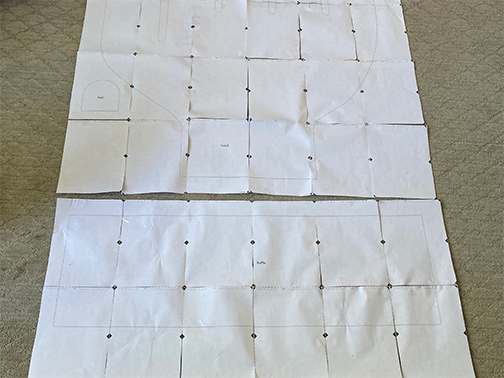
Cut out the hand, ruffle, and nail patterns.
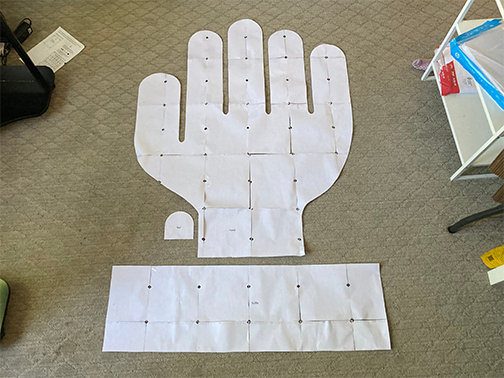
2. Cut out the Hand
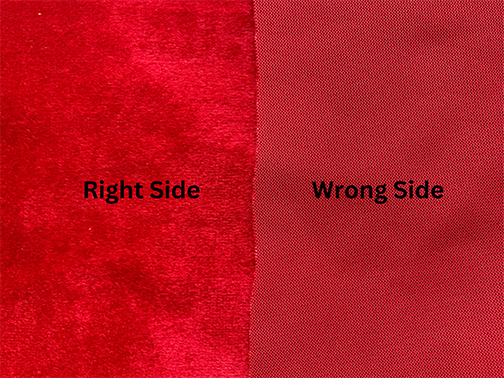
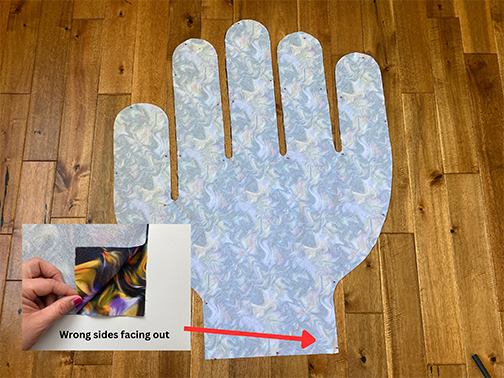
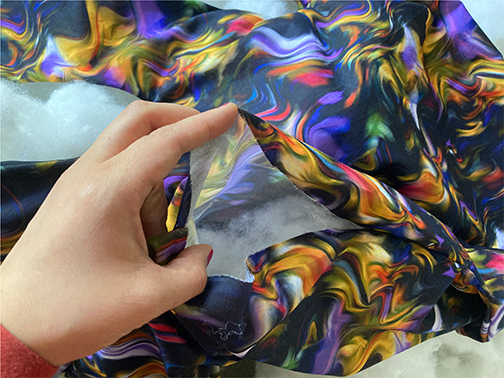
First, determine the right and wrong sides of your fabric.
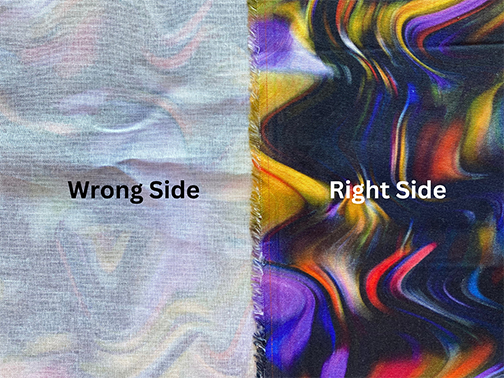
In most cases, it’s pretty easy to determine what the wrong and right sides of the fabric. The right side tends to be brighter, shinier, and looks ‘right,’ whereas the ‘wrong’ side looks dull. If you have a hard time finding the right and wrong side, simply choose one to be the right side and stick with that for the rest of this hand pillow sewing project.
Fold your fabric in half with the wrong sides facing out.
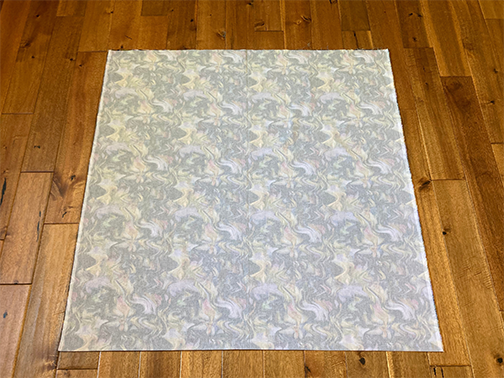
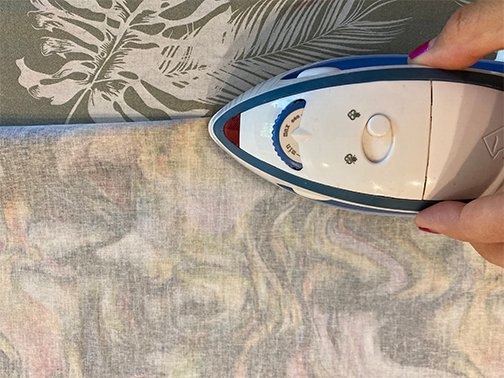
Use an iron to create a crisp fold.
Place the hand pattern along the bias of the folded fabric. This will add a small amount of stretch to your pillow and will look better overall when you stuff the pillow.
*Bias cut means to ‘be cut on the grain’. Rather than following the straight line of the weave, the bias cut places the pattern at a 45° angle on the woven fabric.
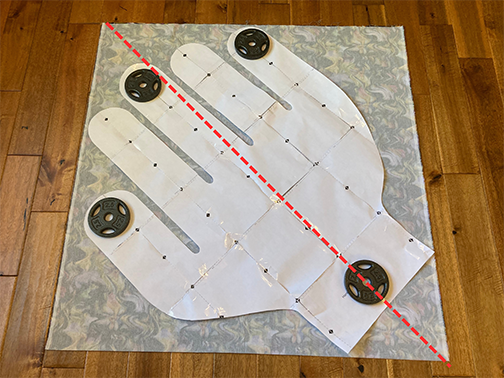
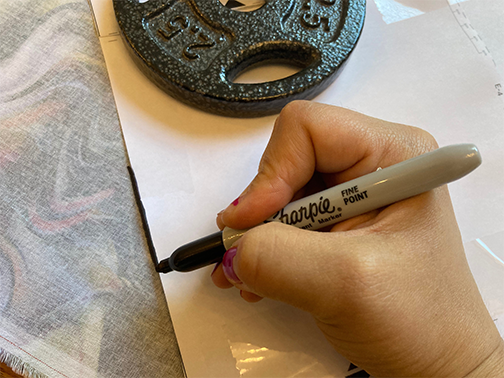
If you have washers or small weights, place them at the tips of the fingertips and bottom of the wrist so that the pattern does not move as you trace the hand pattern.
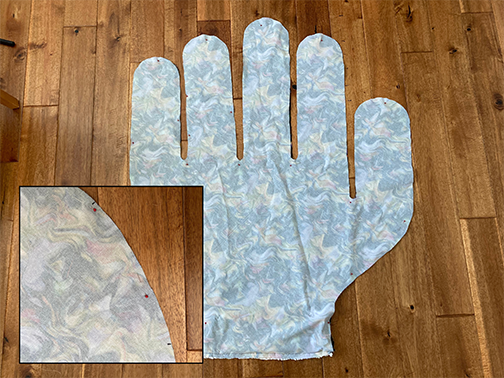
Using a sharpie or fabric marker, trace the outline of the pattern.
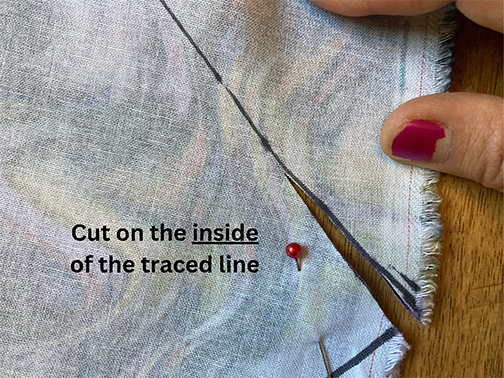
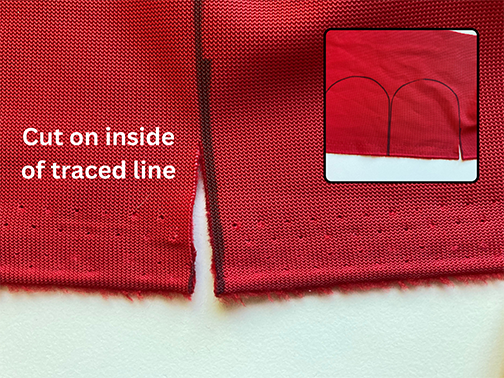
Pin the two sides together along the inside edge, especially along the fingers and the ‘U’ shaped areas between each finger.
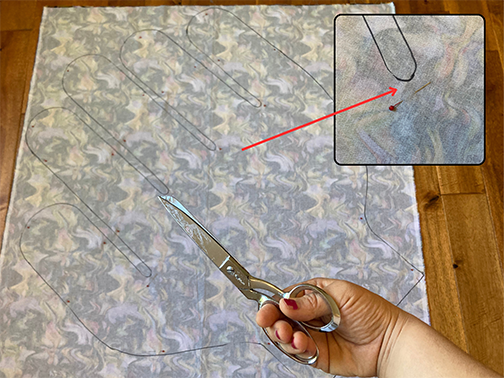
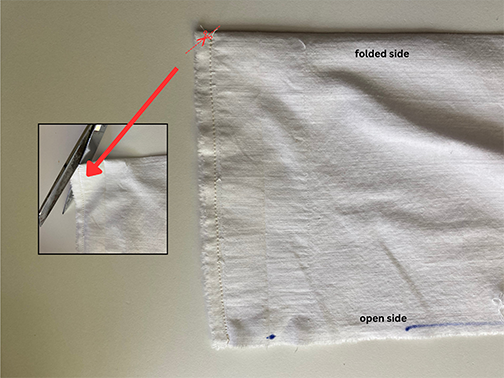
Carefully cut on the inside of the traced line.
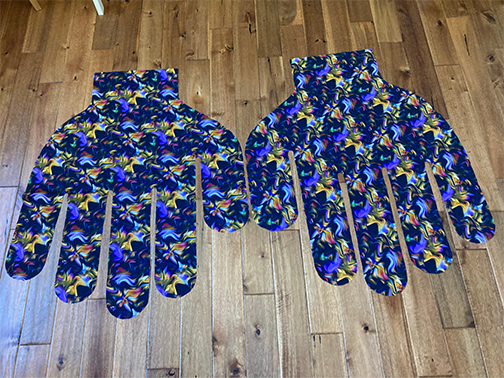
You should now have two fabric hands that mirror each other.
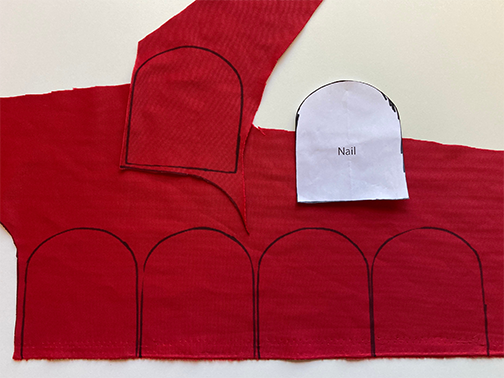
3. Create Nails
Tip: You will see the raw edge of this fabric so choose a fabric that will not easily fray like thick non-stretch velvet.
Determine the right and wrong sides of your nail fabric.
Place the nail pattern on the wrong side of the fabric that you will use.
Trace this pattern 5 times to create the 5 nails you will sew onto the fingers.
Using sharp fabric shears, cut on the inside of the traced lines.
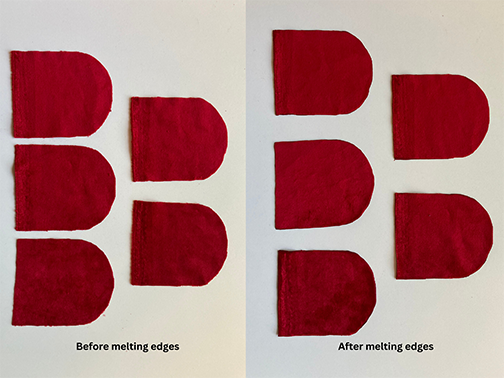
Lightly melt the edges of each nail with a lighter. Make sure to do this in a well ventilated space.
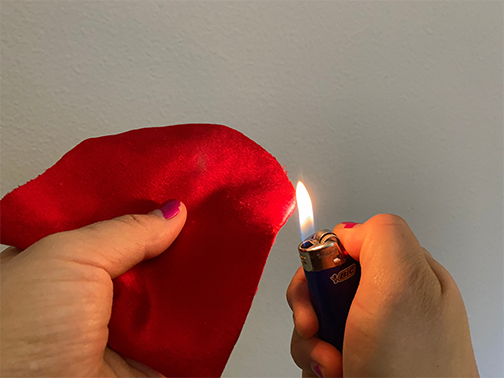
Melting the edges of the nails does two things: 1.Prevents fraying and 2. Cleans up fuzzy edges
4. Create the Ruffle
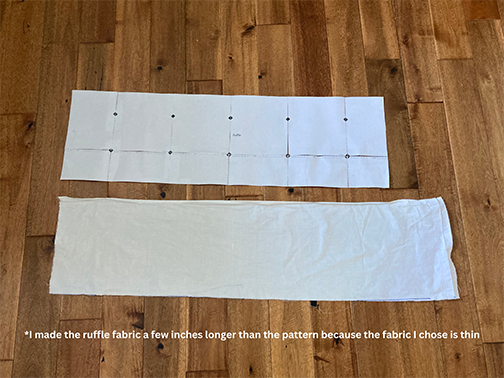
Tip: In this pattern, the ruffle is 3x as long as the edge of the wrist. If you are using a thinner fabric like tulle, you may want to increase the length of the ruffle.
If you need more help to create this ruffle, please watch the video below. I use the second method in this video to create this ruffle.
Trace the ruffle pattern with a sharpie or fabric marker and cut out the ruffle pattern.
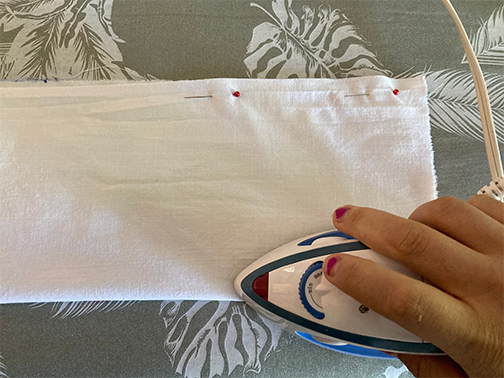
Fold the pattern lengthwise with the wrong sides facing out. Pin and iron the seam for a crisp fold.
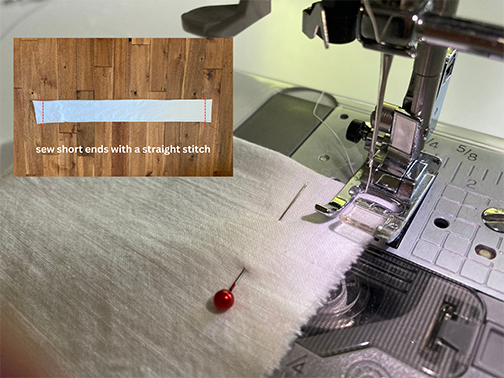
With the wrong sides still facing out, sew the short ends of the fabric together with matching thread. Make sure to backstitch at the beginning and end of the seam.
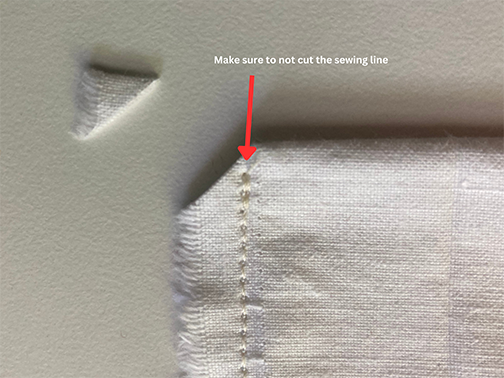
Trim the corners off the edges of the fabric carefully without cutting the sewed lines. This will make for a pointier edge of the ruffle. Make sure not to cut the sewed line.
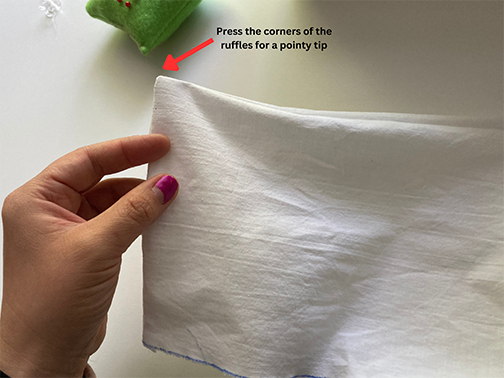
Turn the fabric inside out so that the right sides of the fabric are facing out.
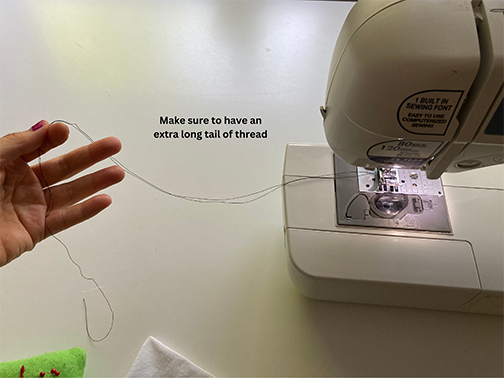
Use a contrasting thread to create the ruffle. You will not see this thread when the pillow is complete, but it is important to see this thread as you are creating the ruffle.
Make sure you have a long tail of extra thread (about 10” or 25.4cm or longer)
Set your stitch length to the longest possible length. My machine goes to 5 so I set it to that.
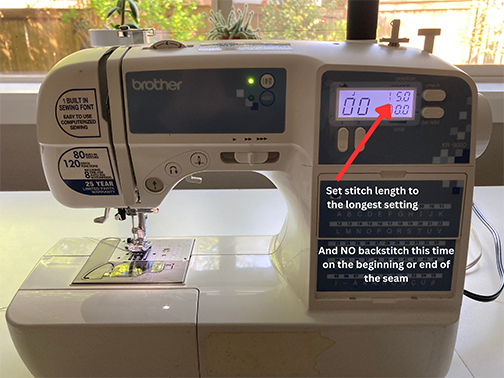
Without doing a back stitch, sew 1/4” or .63cm inside the long end of the fabric together.
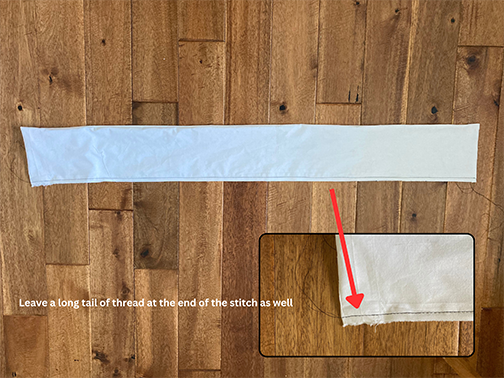
When you come to the end of the fabric, do not backstitch and again leave a long tail of extra thread (about 10” or 25.4cm or longer)
Holding one side of the thread, pull the fabric along the thread, bunching it up as you go. If the thread breaks, take out the broken thread with your seam ripper.. Sew with the long stitch length and try again.
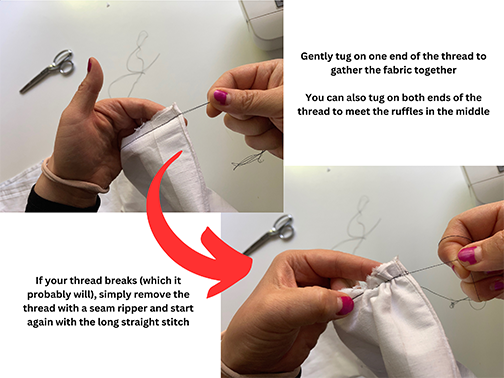
Continue bunching up the fabric along the thread until it is about .5 in or 1.27 cm smaller than the width of the wrist.
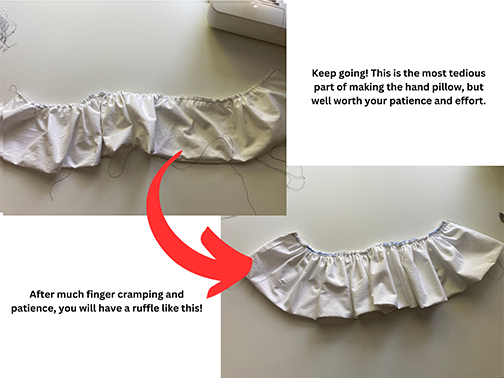
Space out the ruffles to create even gathers.
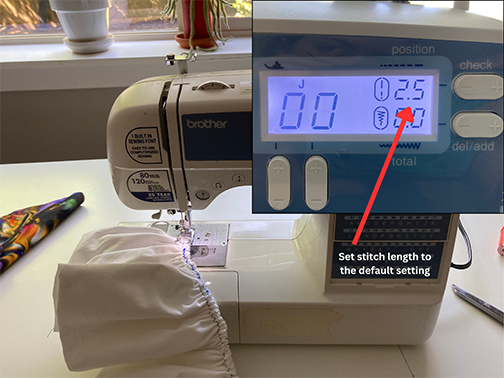
Once your ruffle is the correct length with even gathers, sew a straight stitch along the same edge with your default stitch length (mine is 2.5 so I set it to that).

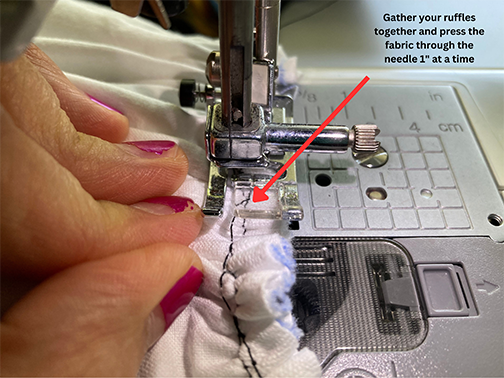
Tip: If you find that your ruffle is a little too long, run the edge through the sewing machine again as you manually bunch up the ruffles in small (1” or 1.5cm) sections at a time until it is the correct length.
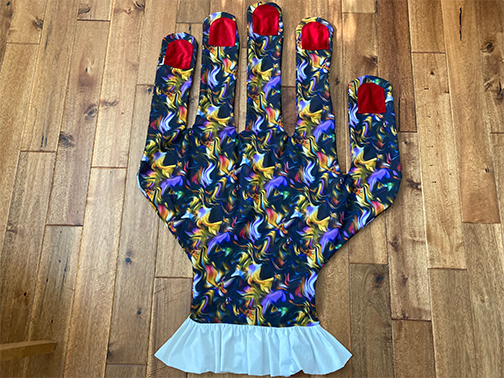
You should end up with a ruffle that looks like this:
5. Sew Nails into the Hand
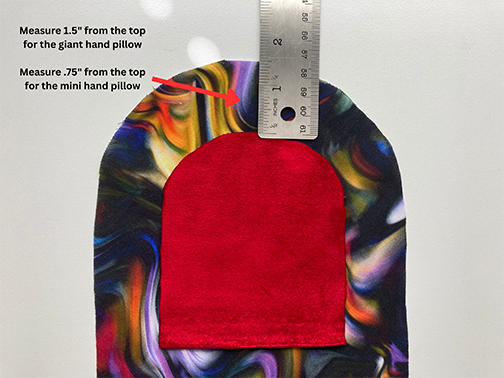
Decide the orientation of your hand pillow (left or right handed). In this instruction, I create a left-hand pillow.
** Measure 1.5” or 3.8cm from the top of each finger for the Giant Hand Pillow and .75” or 1.9cm from the top for the Mini Hand Pillow.
Pin all the nails so that they are centered and install matching thread in your sewing machine.
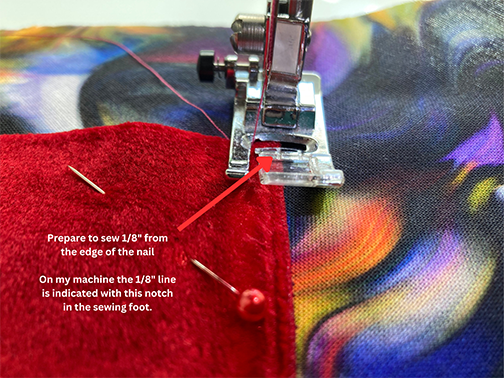
Tip: We will sew very close to the edge of the nail, so make sure to take your time if you are a beginner.
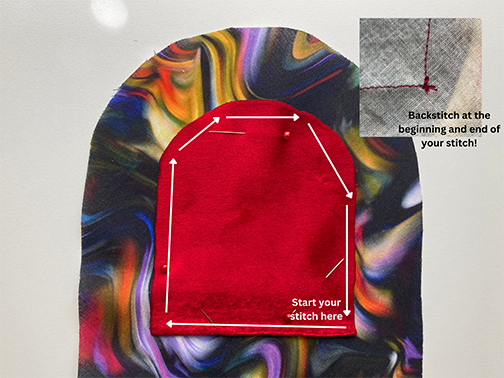
Place the needle ⅛” from the edge of the nail
Backstitch when you start sewing at the corner of the nail.
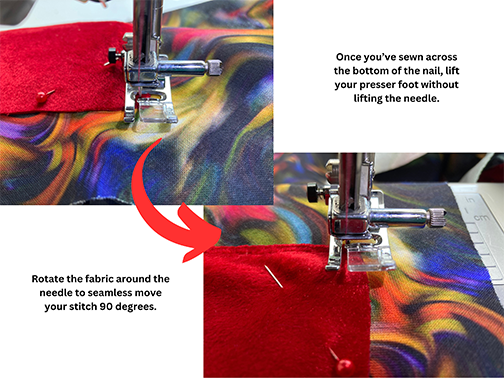
Once you reach the other side of the nail, lift the presser foot without lifting the needle. Rotate the fabric around the needle to continue your stitch.
When you have reached the end of the nail, backstitch again.
Follow these steps for the other 4 nails.
6. Sew Ruffle into Hand
Place the wrong sides of the hand pattern facing out.
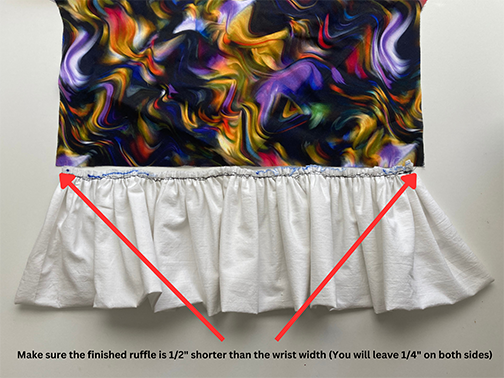
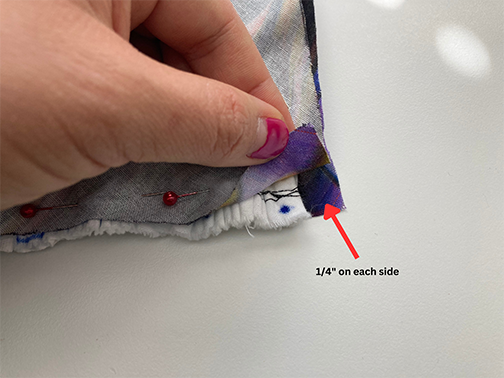
On the wrist portion of the hand, sandwich the ruffle between the two hands with the raw edge of the ruffle slightly hanging out of the two pieces of hand fabric.
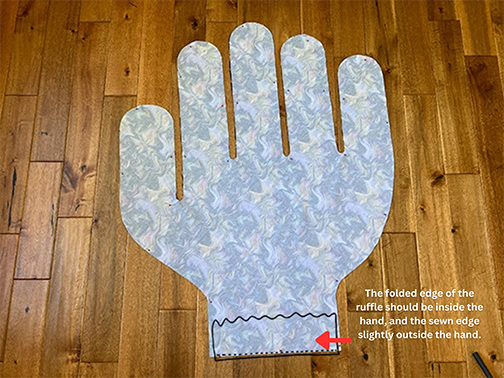
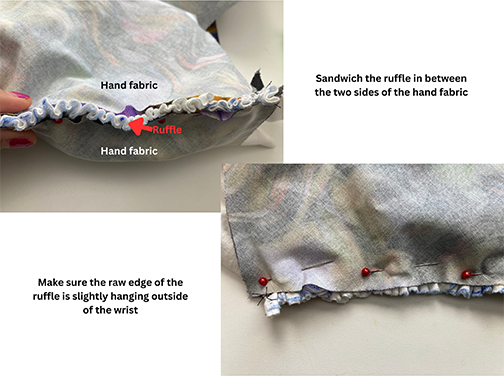
Make sure to leave ¼” or .635cm space on the outermost sides of the ruffle.
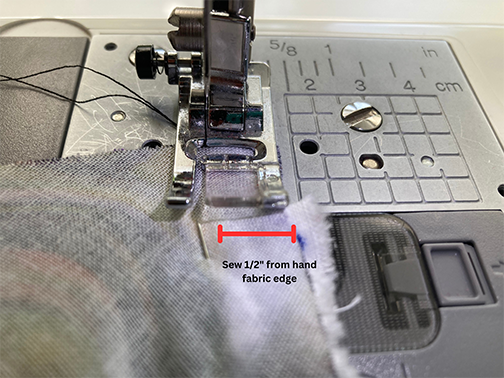
Pin the wrist portion together with the ruffle sandwiched between the two sides of the hand pattern.
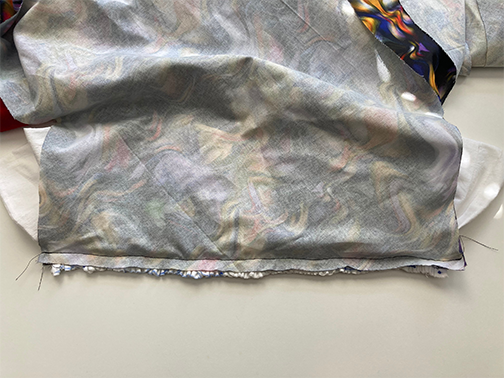
Sew a straight stitch ½” or 1.25cm at your default stitch length along the wrist portion. Make sure to backstitch at the beginning and end of the stitch.
Once you’ve sewn your straight stitch across the bottom of the wrist, it should look like this:
7. Sew the Hand Together
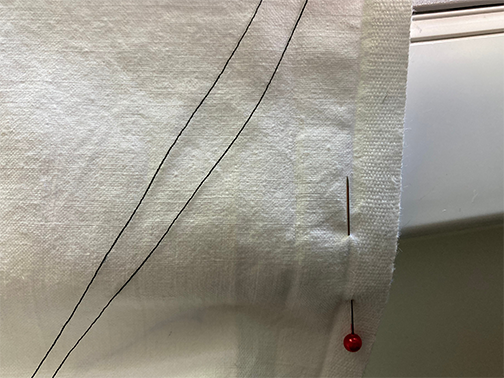
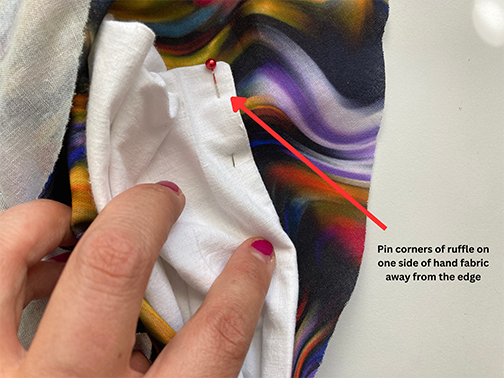
Pin the top corners of the ruffle onto one side of the hand pillow away from the edge of the hand pattern. Orient the pin towards the bottom of the wrist so that it’s easier to take out. This step will ensure that you do not accidentally sew the ruffle onto the edge of the hand.
With the wrong sides of the fabric still facing out, pin the two sides of the hands together.
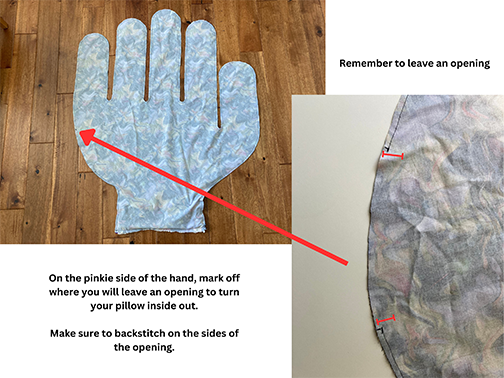
Using a sharpie, chalk or a fabric marker, mark off where to leave an opening to turn the pillow inside out and stuff the pillow. This is very important.
I leave a 8” or 20cm opening on the pinky side of the hand, but you can make it bigger if you need.
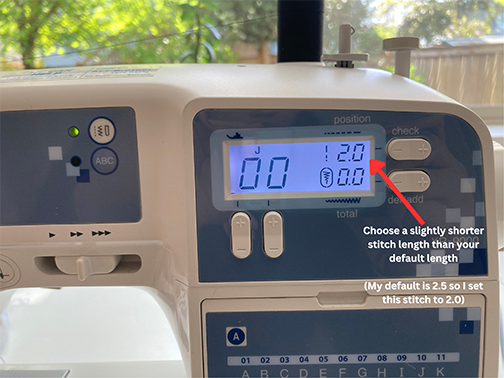
Once you have pinned the two sides of the hand pillow together, change the default setting on your sewing machine to make slightly shorter stitches. The default stitch on my machine is 2.5 so I set my shorter stitch to 2.
These shorter stitches will make the seams stronger and will prevent seam ripping when you stuff your pillow.
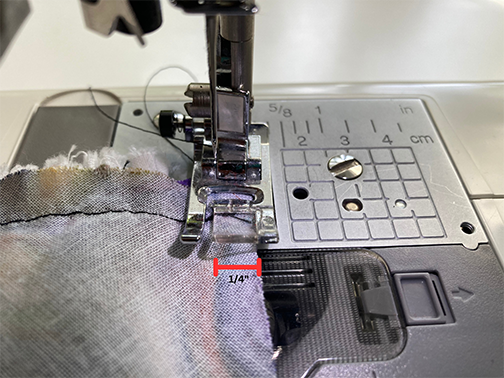
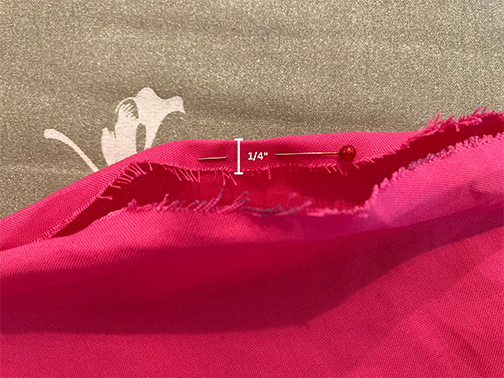
Start your seam on one side of the wrist and sew ¼” from the edge with your shorter straight stitch.
Forward stitch and backstitch at the beginning and end of each sewing, especially at the edges of the opening.
Tip: Take your time when sewing the small ‘U’ shaped areas between the fingers. Lift the presser foot and rotate the fabric around the needle to sew a smooth ‘U’ shape.
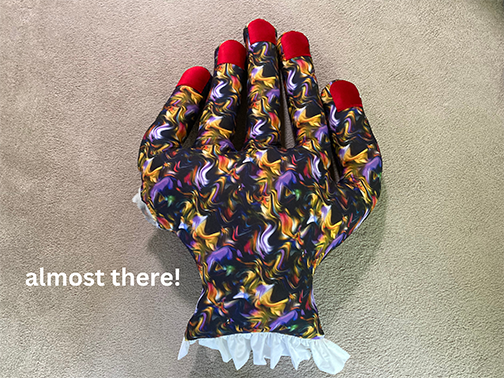
Once you have sewn around the edge of the hand (except for the opening), turn your pillow inside out.

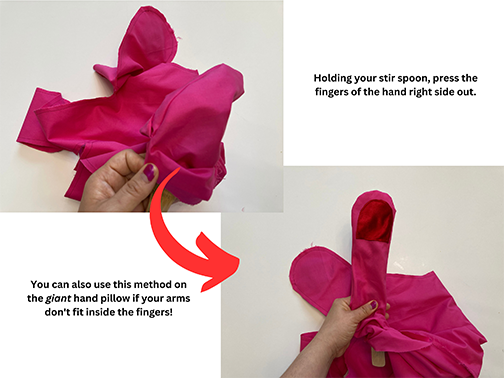
** If you are making the Mini Hand Pillow or your forearms don’t fit into the fingers, turn the fingers inside out with a stir spoon.
8. Stuff your Hand Pillow
Start stuffing your pillow from the furthest finger from the opening.
Tip: Use small handfuls of stuffing to avoid lumps and ensure even distribution.
Work the stuffing into the fingers first and stuff them generously and press against the edges of the seams.
** Use your stir spoon to stuff the fingers for the Mini Hand Pillow or if your forearms don’t fit into the fingers.
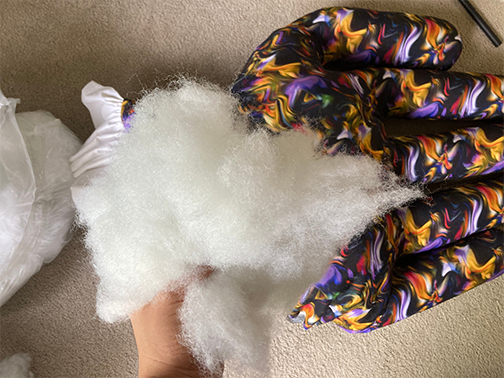
Once you have stuffed the fingers, begin stuffing the palm of the hand with small handfuls at a time.
Stop stuffing when you are satisfied with the firmness of your pillow.
Tip: Occasionally punch down the stuffing in the pillow to ensure even distribution.
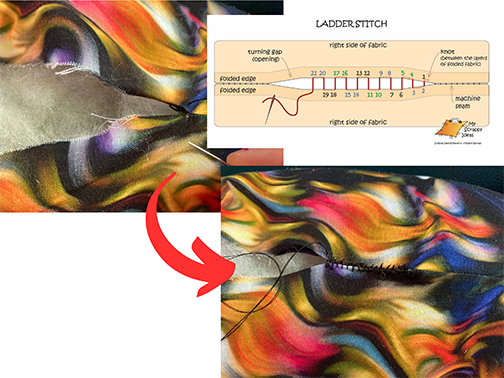
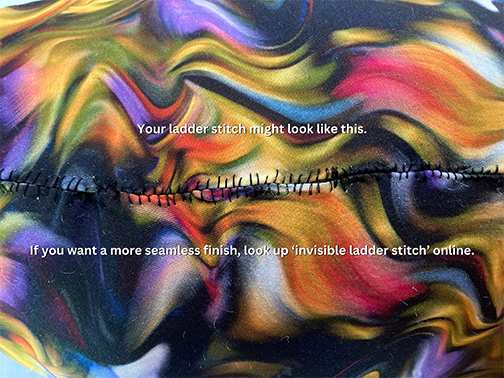
9. Close the Pillow Opening with a Ladder Stitch
Get a sewing needle to manually sew the opening and make a double thread.
Fold the hem of the opening inward. You want it to match the ¼” seam allowance on both sides of the stitch.
Iron the hem to create a crisp fold.
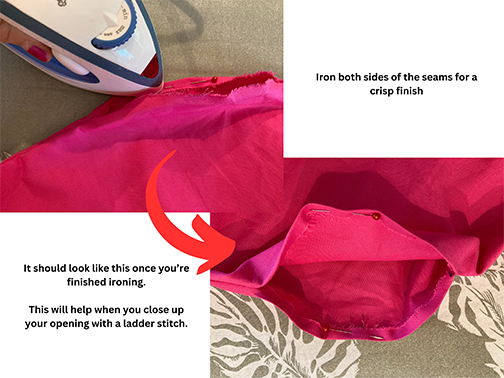
Follow this helpful Wikihow to learn the details of creating a ladder stitch to close your opening.
Use a ladder stitch to close the opening.
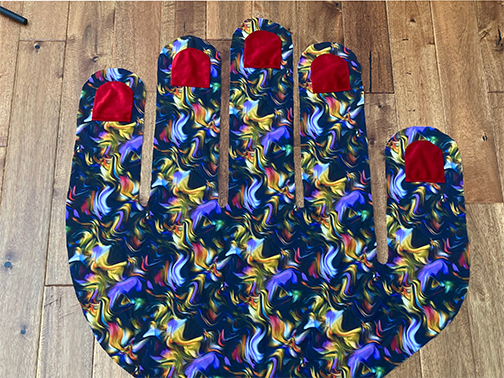
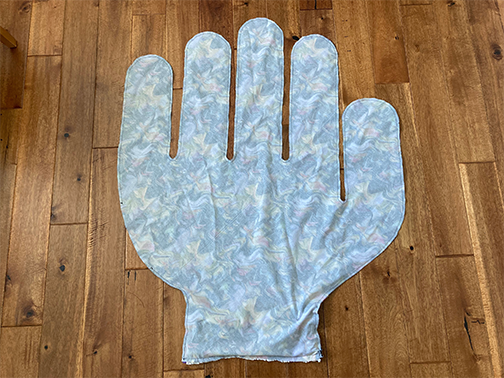
Completion
Your hand pillow is complete!!
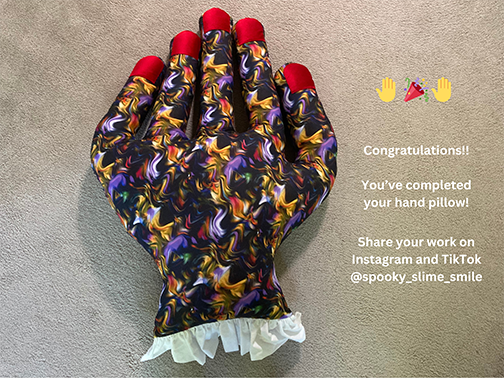
And finally, enjoy the process as you are making this wacky pillow!! Each of us has a divine spark of creativity to make the world uniquely ours. I can’t wait to see what you make! Please share your pillow with me on Instagram or TikTok: @spooky_slime_smile
Let me know if you modified anything and your creative journey.
Again, you can download your PDF sewing pattern for this hand pillow on Etsy.